
How to share and organize group vacation photos
I’ve gone on many vacations with my extended family and we all love to take pictures.
There are 2 challenges when you want to share photos with a group after a trip. The first is finding the best way to share them. The second is sorting through and organizing what is likely multiple photos of the same person, place, or thing. Doing this efficiently can save you time and give everyone the opportunity to enjoy the memories that much more.

Let’s start with the challenge of SHARING.
Your goal with sharing vacation pics is to do it in a way that, quite frankly, doesn’t create a digital mess. Here are a few tips:
While on vacation, text or Airdrop ONLY the pics that you want to use and share right away. For example, if someone takes a group photo that you want to share on Instagram, cool. Text or Airdrop just that photo. DON’T do that with every photo along the way. Why? it creates duplicates upon duplicates when you want to merge them later.
Use a cloud service to do the sharing. It’s really the easiest way. Make sure you use a cloud service that DOESN’T compress your photos and maintains the original size and resolution when sharing. Also, if you took videos, make sure the cloud site you choose can handle them. My favorites are pCloud and Dropbox.
Create a folder for the vacation in the cloud site (e.g. Greek Islands Cruise), then within that, create a folder for each person’s photos (e.g. Tanya_Greek Islands Cruise), then share the link to the master folder. Emailing or texting them the link will make it easy for your traveling buddies to upload their photos in an organized fashion. Easy is good! The individual folders are helpful so you know who has uploaded their pics.
*if one of your traveling companions isn’t very tech savvy, you can either help them upload their photos or do what I did recently and just plug their phone into your computer for a quick transfer.
Encourage your traveling buddies to only upload their favorites. I’m not gonna lie. This is a challenge. Getting people to sort through photos is HARD. Some people have a hard time making choices, while others just don’t want to take the time to do it. If I’m being honest, I would rather have them upload everything and spend a little extra time sorting, than wait weeks, months, etc. for them to get the job done.
Here is why I like pCloud for sharing…
You can set up a folder either on your computer or on the phone app and easily create a link for both techy and non-techy people to upload pics either from their phone or their computer;
You can automatically sync photos from the app to your computer using the pCloud Desktop app (this is helpful later when you are sorting them);
Once everyone has uploaded their photos, you can easily reshare a link to the folder with the merged collection. If a family member has a smartphone, pretty much everyone of all tech abilities can click on the link to view the photos;
It can handle videos with no limits on size;
You can set up a fun page that looks like a website for sharing;
It works across platforms…PCs, Macs, iPhones, Androids; and,
pCloud’s lifetime plans are affordable instead of having to pay a monthly subscription fee. And you get 10gb free, which will typically cover a vacation and then some. Depending on how many photos you have, you may or may not need a paid plan. Your traveling companions likely won’t unless they’ve used pCloud before and have used up their 10gb.
Once you have access to all of the photos, here are some tips for how to SORT and ORGANIZE them.
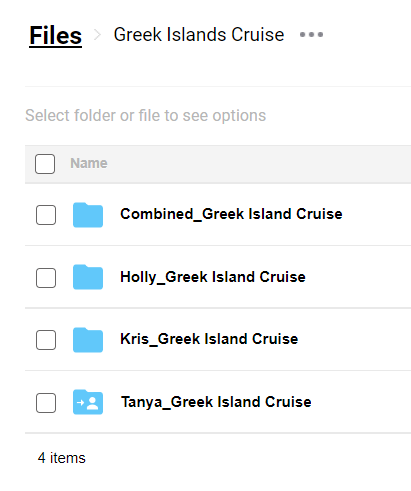
Create a folder labeled “Combined photos[trip name]” in the shared cloud site link alongside the individual traveler’s folders.
Carefully merge the individual traveler’s photos by COPYING (not moving) the photos from the individual folders to the “Combined photos” folder. The reason you want to copy and not move them is in case something happens during the transfer you don’t lose the original photos.
Once everything is merged, using the date metadata built into each digital photo, let the computer help you sort the photos by date. Not only does this help you group them by day, but with the time stamp, it helps you group like photos together from different individuals so you can choose the best ones.
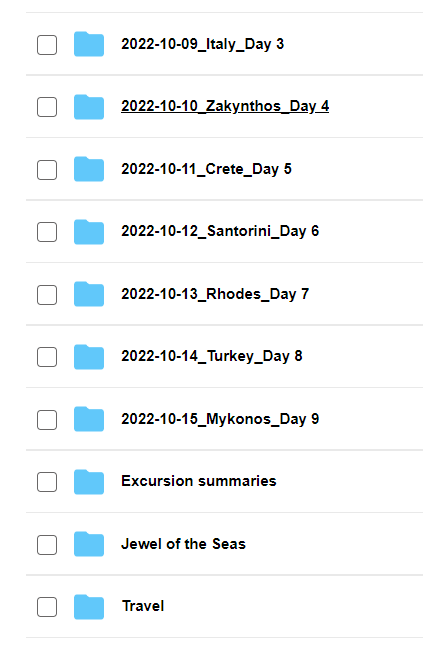
Create a folder for each day of your vacation within the “Combined” folder and/or create theme folders. For example, on a Cruise to the Greek Isles, we stopped in 8 ports on 8 different days. I created a folder for each port stop (e.g. 2022-10-12_Santorini_Day 6), but I also created 1 folder for our time spent on the boat (e.g., Jewel of the Seas) and 1 folder to capture our days of travel on the front and back end of the trip (e.g. Travel).
After I sort through them, I will even create a few sub-folders within these so I can easily find and select photos from special excursions or moments I want to capture for an album or slideshow.
Select and move the photos from the “Combined folder” into their respective day or theme-based folder. This process allows you to take the project in smaller pieces so it is less overwhelming. It’s okay to ‘move’ them (instead of copy) because you have the backup in the individual’s folders.
Rename the photos with the date and the location/theme (e.g. 2022-10-10_Zakynthos_001). Most programs will allow you to do this in batches. it’s WAY faster to do this at this stage of the process vs. in the beginning because they are now grouped and you can do this all at once.
Go through each day or theme folder and eliminate duplicates and redundant photos where there are many shots of the same thing. Select the best and delete the rest. Remember, you still have copies of all of the photos in the individual’s folders, so don’t feel bad about deleting. When you have a combined total of 1500 photos, choices need to be made so you can enjoy reliving the memories instead of being overwhelmed by them.
Share the link to the “Combined folder_[trip name]” back to the group so they can share a beautiful curated collection with their friends and family.
CREATE! Electronically sharing is great, but when you can tell the story of your trip with a slideshow or album, it’s amazing and likely will touch some hearts.


Having trouble choosing a photo organizing system or cloud service that you can stick to? With so many shiny options out there, it’s hard to know which one to choose. Take this FREE 3-QUESTION QUIZ for recommendations on where to store your photos, systems to manage your phone photos, and where to back up your memories.

Holly Corbid is the Founder/Owner of Capture Your Photos, where we help you to organize, preserve, and share your lifetime of memories. Helping you touch hearts with your photos is our passion. We specialize in digital photo organization and work remotely with clients all over the country.
Holly is also the creator of The Photo Organizing Blueprint, an online course that provides a step-by-step guide to organizing your photos.
Find us at www.captureyourphotos.com or contact us here.